BLOGGER TEMPLATES AND TWITTER BACKGROUNDS »
Showing posts with label free. Show all posts

Wednesday, April 7, 2010

My spring break crafts

Sleepy sheep # 5 finito! I added a pink felt flower with a button center. She was finished and given to a very sweet little 3 year old for her birthday! Happy Birthday Bella!


Ladybug, I was bored and improvised her. She's got felt spots, felt bottom and legs, and yarn features (eyes and smile).

I also pumped out this flower. No idea what I'll use it for yet.
 
This one was probably my most fun project. My sister and I recycled a stained sweater (her husband's) and left overs from a pillow case to make these bunnies. We found the pattern here, at Betz White's blog on how to make a cashmere bunny. We didn't have an extra cashmere sweater lying around (who does??) so Nathan's sweater worked just fine! We hand stitched the bunnies adding buttons for eyes (left over from a recycled shirt...also Nathan's....hmm), pink felt lining the ears and stitched a heart shape with a blanket stitch. I made the pom poms for the tail with extra yarn I had lying around, and wa-la! 

What I really love is Rachel and I made them and then realized that they face each other. I don't know how we did that, but they look like they're kissing, so I love it! 
So cute! and absolutely free to whip up! 

I also made another owl. I added wings this time, and now am not so sure I really like them. And his bottom also turned out a lot more rounded than I wanted him to. Now I have to prop him up because he's too round to stand on his own :(

Last but certainly not least is this adorable piggy that came from a suggestion by my sister. I was planning on making a sheep with this fuzzy pink yarn, but my sister suggested the pink fuzzy yarn would be cute for a pig. So I used a familiar body construction and made up the snout, ears, and curly piggy tail. I really like the way he turned out!

Welp, I think that's it for my Spring Break crafting. It seems having time with my family and time to rest made me a rather productive woman! 


Sunday, March 28, 2010

Eggs

I have the extreme good fortune of living relatively close to my family (my sister, her husband, and my parents all live about a 2 hour drive away). So, I get to visit them on holidays and make regular trips, and it isn't a huge expense or burden to travel! This means that for the entire week of Spring break, I'm going to be with my mom and dad and sister's family! I get to play with my niece and actually contribute to her first easter basket, which is so fun!

This inspired me to crochet up a few things for my family including these two easter egg shaped amigurumi:


the bunny is for my niece, Molly

 the egg is for my mom's dog.
I know...pathetic that I crocheted a toy for a dog, but if you knew this dog, you'd understand. Trust me. 

I've had a lot of fun whipping up these real short little projects, cause they're just so darn cute!! You get maximum effect with minimum effort and time :) gotta love that, right??

Saturday, March 27, 2010

Easter is in the air!

Here is one quick project whipped up for my niece's easter basket:

This is before I finished his other ear, but you get the picture...literally. :)
I used blush to color his cheeks and ears, and he's basically an egg with a face and bunny ears. 

This a free pattern I found on Ravelry by RoxyCraft blog, called Bunny Boo.
If you're in need of a cute easter project I highly recommend this one! 

Friday, February 26, 2010

Craft time with the sister!

I had the fortune of being bored out of my mind this week on account of my husband being out of town on business. Why do you ask is this fortunate? Well because it inspired me to get off my duff and make a trip to my hometown to visit my parents and my sister, her husband, and my favorite baby, my niece Molly!

I spent Monday through Wednesday there, and all day Tuesday was spent crafting with my sister in her lovely new house. (This is the sister I'm planning on opening an Etsy shop with) She brought out an old sweater of her husband's that she accidentally shrunk in the dryer. Who hasn't done that before?! And had a wonderful idea to use it as fabric for a pillow cover. She had an old pillow form lying around, just waiting for some love and attention! So she cut up the sweater and an old pillow case for the back, and sewed it all up in a jiffy using a sewing machine my parents wanted to get rid of.

She asked me if I would be willing to crochet some flowers for her pillow, and then I got the idea to use these giant buttons I had bought at the Dollar tree, and crochet flowers that would button on, so if she ever wanted to change the color of the flowers (to match her decor) she had the option! Brilliant!...if I do say so myself :)

Well we put our heads together and came up with a marvelous pillow cover all for 0 dollars, and 0 cents!

We also used embroidery thread and did a blanket stitch along the bottom to close it up :)

Ps. if you're wondering how I made the flowers, I just made it up as I went. 
But there is a real similar pattern for a flower like this found for free at Lion Brand here.
And just for posterity, a recent picture of Molly-dolly! 

Amigurumi Friday!-using felt

Remember this sweet face from earlier in the week? 
Well today we're going to talk about how to do it!
First off, thank you Harugurumi for the excellent pattern of the sleepy sheep, available free on her lovely blog! This is my version using felt for the face and embroidery. (Her sheep have a crocheted face and yarn features) 
Supplies you will need (for face only): Felt, scizzors, chalk or marker, embroidery thread, tapestry needle, and a little imagination!
I crocheted the head of the lamb, then traced onto the felt using white chalk the shape of the face I wanted...somewhat of an oval. You can get super particular here about having a true oval shape, but I prefer the home-made with imperfections look. I think it gives the animal character! 
Then you cut it out!
Next, trace onto the back of the oval the shape of the eyelids so you don't embroider blindly- and choose the color you want to embroider the eyes with. Begin!
I went one way with simple straight stitches and then back on the curve filling in the gaps left. 

Next add the eyelashes by beginning in the back of the felt, poking the needle through at the eyelid, and stitch out and down, always beginning at the back of the felt at the eyelid.

You getting the picture? good! Now do the other one :)

(Here's a view from the back, so you can see the mess is always on the wrong side of embroidery. That's why you do the face before attatching it to the head!) 
Right, now for the nose and mouth. Start at one central point and fan out your stitches to the left and right for the nose. I chose a peachy-pink :)
Ok, once your done with that, put your needle from the back, right into the bottom of the nose and do just 1 vertical stitch down for the mouth. 
(Make sure you tie everything off in the back! )
Now, to sew it onto the face, you can continue using a straight stitch as I did with the brown face, or you can choose to do a blanket stitch. That looks like this:
Here's how:
Enter your needle from back, and make sure before you put your needle back into the fabric that your needle passes above the thread left from your last stitch before you pull tight! 

I hope those images are actually helpful!

I find it's beneficial to safety pin on the face as your sewing so the features don't move around on you
But that's about all I have for you this week. I'd love for all of you to try your own lamby face, and share how it turned out! 

Saturday, February 6, 2010

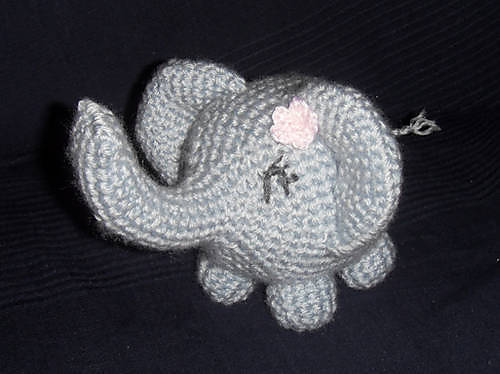
Introducing: Elephant

This is my latest crochet creation, and I just love him! He worked up super cute and super fast too!
(The trunk is made pliable by placing a pipe cleaner in the trunk. I chose not to stuff it, as well as the ears. )


Another excellent FREE pattern from Lion Brand found here


I just am having a difficult time trying to decide whether I should give him eyes. I kind of like him plain... do you agree? I'm contemplating using embroider floss and giving him eyes like this:

What do you think?

Friday, January 29, 2010

Sleepy Sheep

Free Pattern from Harugurumi Blog- Sleepy Sheep

Sleepy sheep will soon have a new sleepy sheep friend


Want to make your own? go to this site!