BLOGGER TEMPLATES AND TWITTER BACKGROUNDS »
Showing posts with label baby gifts. Show all posts

Sunday, March 28, 2010

Eggs

I have the extreme good fortune of living relatively close to my family (my sister, her husband, and my parents all live about a 2 hour drive away). So, I get to visit them on holidays and make regular trips, and it isn't a huge expense or burden to travel! This means that for the entire week of Spring break, I'm going to be with my mom and dad and sister's family! I get to play with my niece and actually contribute to her first easter basket, which is so fun!

This inspired me to crochet up a few things for my family including these two easter egg shaped amigurumi:


the bunny is for my niece, Molly

 the egg is for my mom's dog.
I know...pathetic that I crocheted a toy for a dog, but if you knew this dog, you'd understand. Trust me. 

I've had a lot of fun whipping up these real short little projects, cause they're just so darn cute!! You get maximum effect with minimum effort and time :) gotta love that, right??

Sunday, March 21, 2010

Update

I apologize for my absence. Quite honestly I have felt less than inspired to blog, and the circumstance of having no digital camera in the last two weeks has not helped. However, since my absence, I have gotten a decent amount of crocheting done on my granny squares, and have finished a doll for my niece. I have also purchased a new camera to document all the things that you have been missing out on!

It's a Nikon Coolpix L110, and so far I'm loving the quality and clarity of the images! See for yourself on some of my pics I've taken since getting it:


Tuesday, February 16, 2010

Help!

I'm stuck with no project to crochet! I have so many options, but nothing really stands out to me! I'd like to make a cute thing for baby- booties, amigurumi, sweater, cap...something that works up fast and turns out really cute.


I feel so lost for inspiration. Any ideas??

Saturday, February 6, 2010

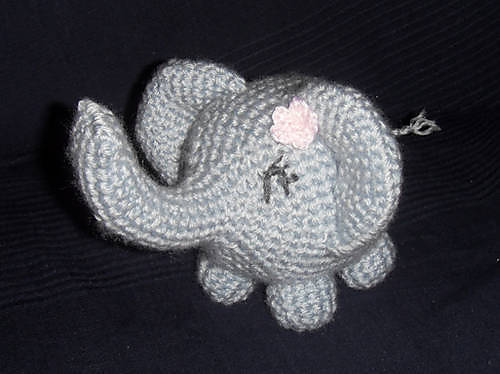
Introducing: Elephant

This is my latest crochet creation, and I just love him! He worked up super cute and super fast too!
(The trunk is made pliable by placing a pipe cleaner in the trunk. I chose not to stuff it, as well as the ears. )


Another excellent FREE pattern from Lion Brand found here


I just am having a difficult time trying to decide whether I should give him eyes. I kind of like him plain... do you agree? I'm contemplating using embroider floss and giving him eyes like this:

What do you think?

Friday, January 29, 2010

Sleepy Sheep

Free Pattern from Harugurumi Blog- Sleepy Sheep

Sleepy sheep will soon have a new sleepy sheep friend


Want to make your own? go to this site!

Amigurumi Friday! -sewing


I can't believe it's that time again! Yep folks, time for the second installment of "Amigurumi Friday"- the series that's all about our favorite crocheted toys!
For this installment, I wanted to talk about everyone's least favorite part of making amigurumi. The sewing together of all those little pieces. I want to offer a few tips that make it a little less arduous and a little more successful using a project I just finished: Lion Brand's Pond Friends Stacking Toy.

As you can see, this little toy, has a LOT of separate parts and pieces, even facial features and antennae to sew on! So, lets get started!
(I'll be using the bee ring as my example)
Here are the tools you will need:

That's right! Safety pins and a yarn needle (which you can find at a craft store in the same section as knitting needles and crochet hooks, normally right next to the stitch markers!) I recommend a round yarn needle because they seem to go in smoother than the square ones. If you have a knifty knitter, you'll have a square needle, and those just don't seem to work as well for such tight crocheting. 
Tip #1: Once you finish an individual part (say a wing for the bee), finish off the end by pulling the yarn completely through your last stitch, and leave a good amount (10-12inches) of yarn on the end to sew with. This way you don't have to attach any extra yarn (extra work!) and you already have the right color yarn to sew with ready to go! You will be left with only one end of your yarn to hide after sewing as well. 
As you can see here, I finished the white wing, then left a long tail to sew with.


Tip #2: Saftey pins are your friends! How many times have you crocheted up everything perfectly, but after sewing it all together the amigurumi just looks wonky? I know I've had that experience, so now I always safety pin on all my pieces and parts before sewing them on. This has several advantages, the first being that you get some idea of what it is going to look like after you sew it on. If you start sewing without holding things in place, the pieces can slip and adjust their position-ending up in a completely incorrect or weird place. That leads me to the second advantage- You don't have to struggle to readjust and hold the dang piece on while you're sewing! It's marvelous! Lastly, if you have a lot of pieces that need to be balanced out with each other -lets say an arm looking even with another arm and not to far from the neck, or in the case of the bumble bee- wings that are even and a head that is directly across from a stinger- then you can check the balance and get everything proportionate before it's too permanently affixed. 
Tip #3: Use the stitches you have to sew evenly. If you try to match up stitch for stitch in what you are sewing on (assuming that you've kept an even gauge in both pieces) you will have no problem in spacing out your stitches evenly and making sure that your piece is sewn on in a sturdy and even-looking manner. I normally go into the piece I'm attaching the new piece onto before picking up a stitch on the piece I'm attaching. (Sorry if that doesn't make sense) For example- here I went down into the bee ring with the white wing yarn, then up the wing. 

Tip #4: Hide your ends within the amigurumi! Once you've finished sewing, take the extra end, and pull it through the amigurumi to another side. Then just stuff in the extra yarn. No need to tie knots. Your piece is secured by the stuffing. 

Wa-la! You are done! There are no visible knots because one end came from the piece you just sewed on, and the other was hidden within the amigurumi!

Here are some more pictures of the process with the head of the bee: 
My last Tip #5: is that sometimes is best to stuff as you sew. In this case of the head, it was hard for the head to stay on, even while pinned with the stuffing in it. So I approached it as I would a pillow. I went around 3/4 of the way, then stuffed the head in the finger sized hole left to sew. 
I know that it can still be a rather tedious process, but hopefully with these tips your toys will come out marvelously! 

Happy crocheting!

Thursday, January 21, 2010

Teddy Bear


(I love his little bum!)

I usually am against purchasing patterns, simply because there are a plethora of amazing free patterns online. My thinking is, if I can get something just as good for free, why pay for it? The problem with my obsession for free patterns is that sometimes, there simply isn't a good enough free pattern online for the object you desire to create. This is the problem I ran into when trying to find a cute-enough teddy-bear pattern. I wanted it to actually somewhat resemble a teddy bear, and it seemed that although there were plenty free patterns out there, nothing looked right. That is until I came upon a pattern on about.com under their crochet section. Sandi Marshall has designed a teddy bear, and a good sized one too that is super cute, and I finally had myself a pattern worth making! (You can find the free pattern here)


My friend's baby Josiah just had his 1st birthday so he was the lucky recipient of this adorable bear! Now all I need are pictures of him playing with it!


This is some of the construction of the teddy bear. I used worsted weight yarn on all his features including his nose and eyes so he is completely baby-safe!

Wednesday, January 6, 2010

Crocheting for my Molly


What can I say? The girl inspires me!

Saturday, October 3, 2009

It's been a while...


My recent crafting endeavors. (baby hippo, booties, a card, and my finished blanket).